How to refinish old wooden furniture for a new look
Complete Guide to Refurbishing Old Wooden Furniture: A Detailed Process from Assessment to Completion
Carefully observing the current state of wooden furniture is the first step to a successful refurbishment.
Identifying the type of existing coating is crucial to choose the appropriate refurbishment products.
Gather basic tools such as sandpaper and protective gear.
Select the appropriate grit sandpaper based on the condition of the wood.
Maintain a steady hand while sanding to avoid wave patterns.
Choose staining or covering paint based on the intended use scenario.
The surface must be thoroughly cleaned and basic sanding completed before applying color.
Thin coats in multiple layers yield a more even finish than a thick single coat.
The final coat determines the furniture's lifespan and texture.
Different types of varnish correspond to different protection needs.
Ensure the surface is free of dust and grease before applying varnish.
Multiple layers with sanding in between yield the best results.
Sanding before the coat is dry is a common mistake.
Gloss level should match the overall home decor style.
Regular maintenance can extend the durability of the refurbishment effects.
Observe the wear of the coating to determine the timing for reapplication.
Complete Tool and Material Preparation
Deep Assessment of Furniture Condition
Before starting the refurbishment, check the furniture carefully as if consulting a doctor. Use your fingertips to feel the surface for unevenness and observe the paint surface side-lit for any cracks. Pay special attention to whether joints are loose, which may require wood glue for reinforcement. Record all areas that need attention, such as taking photos with your phone to mark areas with paint loss, making subsequent processing more efficient.
There’s a trick for determining the type of original coating: dab a cotton swab in acetone and rub a hidden area. If it dissolves, it is nitrocellulose paint; if not, it may be polyurethane. Understanding this is important, as different coatings require corresponding removers, and choosing the wrong product could cause chemical reactions that damage the wood.
Tool and Material Procurement List
Preparing tools is like assembling surgical instruments: have three sheets each of 80-220 grit sandpaper (80 grit for rough sanding, 220 grit for fine sanding), and an electric sander for larger areas to save effort. For protection, it is recommended to choose a dust mask with a breathing valve, as ordinary masks cannot block fine wood dust. Don’t underestimate safety goggles, as splinters from sanding can injure your eyes.
 When choosing stain, there’s a trick: for coarse-grained woods like oak, oil-based dyes can highlight the grain, while for finer-grained woods like maple, water-based dyes are more uniform. Prepare brushes of different sizes—wide brushes for flat surfaces, pointed brushes for carvings. Remember to buy some rags; cloth pieces cut from old T-shirts absorb water better than commercial wipes.
Furniture Pre-Treatment Process
Three Steps of Surface Treatment
Like giving furniture a spa treatment, the first step is deep cleaning. Wipe with a solution of 1:3 vinegar and water to remove years of accumulated grime; stubborn stains can be gently scrubbed with 0000-grade steel wool. Pay special attention to carved areas, which easily hide dirt; you can use an old toothbrush dipped in baking soda paste for careful cleaning. After treatment, remember to use a hair dryer on the cool setting to thoroughly dry any moisture in the gaps.
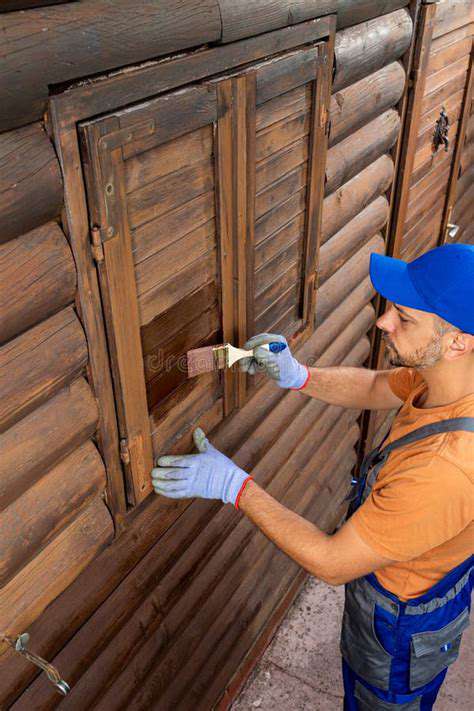
The method of removing old paint depends on the material: alkyd paint can be softened and scraped off with a heat gun, while water-based paint is suitable for chemical paint strippers. An eco-friendly tip: covering the paint stripper with cling film can speed up the reaction and reduce evaporation. After treatment, wipe off residue with spirits, as this step directly affects the subsequent coloring effect.
Precise Repair Techniques
When encountering wormholes, don’t rush to fill them; first, inject epoxy resin via a syringe to reinforce the internal structure. Wood filler should be applied in three layers: fill 80% during the first layer, then dry and sand before adding the remaining part. Special attention should be paid to antique furniture processing; it is advisable to retain some historical traces to maintain value. For cracks more than 3mm, consider inserting wooden wedges, as this is more robust than simply filling with paste.
Sanding transitional areas requires skill: wrap sandpaper around a sponge block to sand edges, which can create a natural curve. Finally, use a vacuum cleaner along with a lint roller to handle dust; this is a crucial step that many beginners often overlook. The surface pre-treatment is considered standard only when it feels as smooth as silk to the touch.
Secrets to Perfect Sanding
The Art of Sandpaper Usage
Different grits of sandpaper should be used in harmony like a symphony: 80 grit for removing old paint, 120 grit for flattening the wood surface, and 220 grit for final polishing. Change the grit every time by sanding at a 90-degree angle to clearly see whether the previous grit’s marks have been removed. For curved areas, sandpaper can be folded and used at the edges for precise sanding.
Control the pressure when using power tools; the sander should always be kept moving. A professional tip: placing a felt pad at the bottom of the sander can automatically absorb some pressure, avoiding over-sanding. Take breaks every 15 minutes to check the flatness with your hands, as touch is more sensitive than sight.
Handling Special Areas
Dealing with carved areas requires patience: wrap sandpaper around the tip of a chopstick to treat grooves, and polishing strips used for nails are suitable for fine patterns. For large flat areas, use the “X” sanding method: sand vertically first, then horizontally, and finally diagonally to ensure no spots are missed. Corner areas should be lightly swept over like in calligraphy to avoid rounding corners.
After sanding is complete, conduct a white glove test: wear cotton white gloves and wipe the surface; if fine fibers catch, further sanding is needed. While this step is time-consuming, it ensures an improvement of over 30% in the uniformity of the subsequent coloring.
Staining and Coating Techniques
Color Selection Strategy
When choosing colors, consider the space's lighting: warm tones are suitable for north-facing rooms to compensate for insufficient light, while cool tones can balance bright light in south-facing rooms. When testing color samples, observe in three phases—just applied, half-dry, and fully dry—because wood absorbs color, which can lead to differences in the final effect. For dark furniture, bleaching first is recommended to achieve purer colors.
There’s a professional method for color mixing: mix 95% target color with 5% complementary color (such as a little green with red) to enhance color depth. Water-based acrylic paint is recommended for children’s furniture; it is not only eco-friendly but also forms an elastic film that is more durable after curing.
Professional Coating Techniques
- Use the three wipe method for staining: wipe with the grain → wipe against the grain → finish with the grain.
- When painting, adhere to the principle of thin, fast, and even: each layer should not exceed 0.1 mm.
- For edges, outline first and then fill the surface to avoid buildup.
There’s a secret when brushing: dip the brush hairs into the paint up to 1/3 of their length and scrape off excess liquid at the edge of the bucket. Start the brush stroke at the middle and naturally extend towards both ends. Adjust the time between brush strokes based on humidity; lightly touch with a finger to check that it is not sticky for the next layer. The final stroke should be like the action of lifting a brush in calligraphy, which reduces brush marks.
Varnish Protection Layer Application
Varnish Type Comparison
Polyurethane varnish is wear-resistant but hard to repair, while nitrocellulose varnish is easy to apply but has poor weather resistance. Recently popular water-based UV varnish requires special curing equipment, suitable for mass production. A compromise solution is to use a penetrating oil-based varnish for the first layer and a water-based varnish on top, ensuring adhesive strength while being eco-friendly. Note that different brands of varnish should not be mixed, as it may cause chemical reactions.
Secrets for Perfect Application
Environmental control is essential: ideal temperatures are 20-25°C, with humidity at 45-65%. Use a three-layer approach: let each layer dry for 3 hours, with a total of 3 layers. For interlayer sanding, use 600 grit wet sandpaper dipped in soapy water for light sanding; this step makes the surface as smooth as a mirror. Finally, use polishing wax with a wool wheel for a mirror finish, which can enhance gloss levels by two grades.
Common Issue Solutions
If the \orange peel\ effect occurs, it may be due to an overly thick film or high environmental temperature. The remedy: sand down with 400 grit to smooth it out, then apply a thin corrective layer. Bubbling issues often occur from air in the brush; it is advised to use a defoamer and let it sit for 15 minutes after stirring. Drips should be promptly brushed away with a stiff brush, as they will be difficult to handle once cured.
- Setting Clear Goals for Success in Personal and Professional Life
- Achieving Effective Work Life Balance: Practical Strategies for Busy Professionals
- Mindfulness in Design: Cultivating Awareness Through Thoughtful Creativity
- Job Creation Significantly Elevates Economic Growth and Stability
- Creating an Efficient Workspace: Key to Enhancing Focus and Productivity
- Creating a Consistent Schedule: A Key to Enhanced Focus and Productivity
- Maximizing the Lifespan of Hardwood Floors: Tips for Enhanced Durability
- Embracing Simplicity: The Essentials of Minimalist Design for Modern Living
- Choosing Wooden Furniture: A Guide to Timeless Elegance and Durability
- How to style your wooden furniture for a farmhouse look
- Best wooden storage cabinets for organizing your home
- How to combine wood furniture with bold interior colors